By
anders pearson
19 Aug 2023
The other day, a recent post here made it to the front page of Hacker News:
I don’t know if that still counts as a huge amount of traffic, but there was definitely a spike:
(All the graphs in here are over the same 24 hour period).
I thought it might be interesting to show how the site, built on Elixir and the Phoenix web framework with basically zero attention paid to caching, scaling, or performance beyond what Phoenix does out of the box, performs when dealing with a reasonably large amount of traffic.
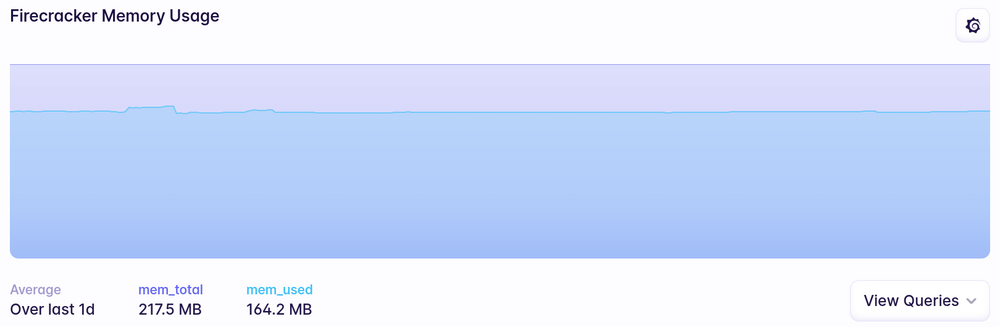
I run on Fly.io, with the site on a 256MB Firecracker VM (their smallest, and still on the free tier). The PostgreSQL database is shared with a dozen other applications and also runs on a 256MB VM.
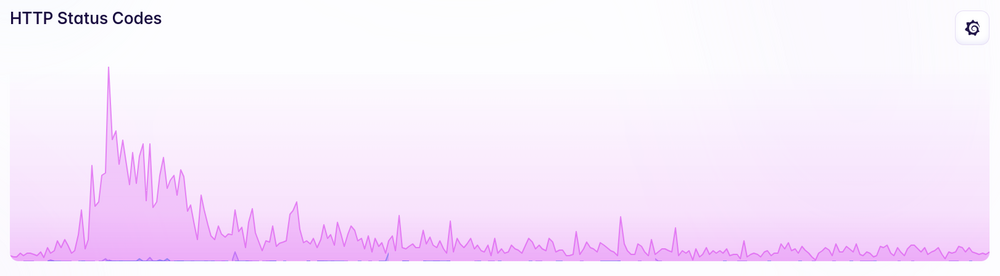
There were a couple spikes in response time, but those actually seem pretty common for the site in general and are mostly from deployments rather than changes in traffic:
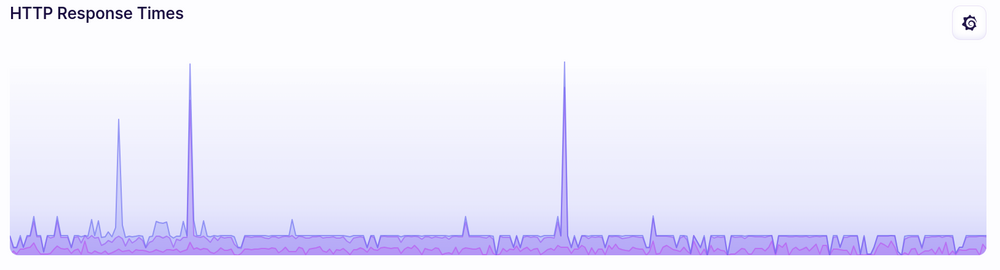
For the most part, response times didn’t really change when it was getting the HN traffic spike.
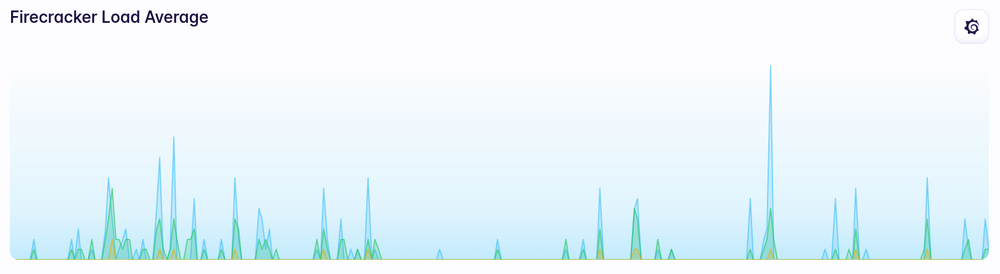
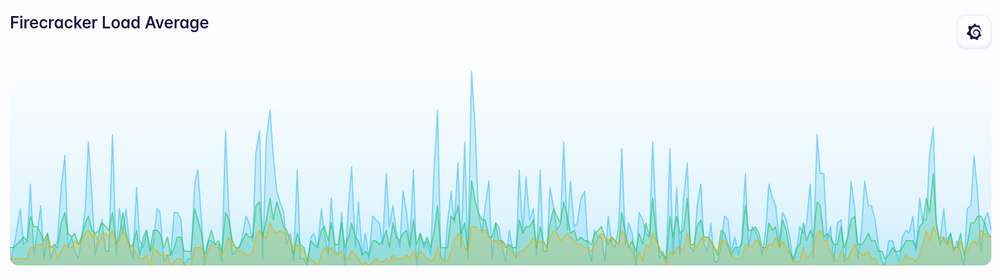
Load average doesn’t really show much of a change either:
Memory usage went up slightly but never even came close to being a problem:
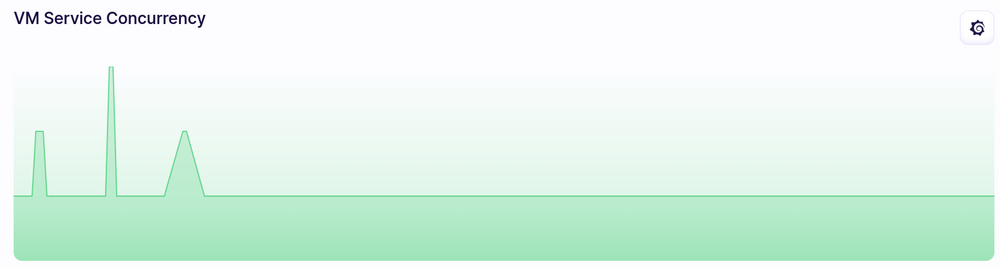
Fly.io spins up more VMs as needed (I’m not actually sure what load/events/whatever trigger that scaling) and it looks like maybe that happened a bit more often during the spike:
PostgreSQL handled things like a champ too. No real noticable load or memory usage over my usual baseline:
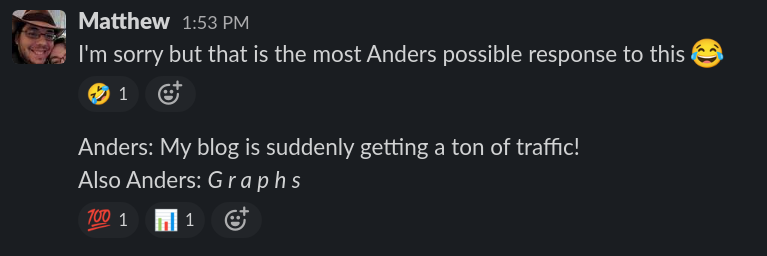
I posted a few of these in a Slack channel while it was happening and I feel like I should probably include this reaction:
By
anders pearson
05 Aug 2023
The conversion happened a while ago, but I haven’t gotten around to mentioning it until now.
This site is now running on a backend written in Elixir and the Phoenix web framework.
Before I share my thoughts on that, I need to mention a bit of history. This site started out more than 20 years ago, running on a Linux box in my dorm room. In the late 90’s I had a personal blog (statically generated by Perl scripts) and a shared message board app for my friends and I to post on and keep in touch. At some point, I merged those and made it more of a multi-user blogging platform. I kind of used it as a testing ground for various ideas I had, like adding a dedicated post type for images/photos, or for links (called “bookmarks” on here and obviously inspired by Delicious), approaches to tags, metadata, versioning, threaded comments, etc. Eventually, when I was pretty much the only one posting, I switched it back to being more of a single-user blog (but leaving all the old content in place, because Cool URIs Don’t Change), turning off comments (because we can’t have nice things) and generally turned off or hid features that no longer seemed important.
It was also my platform for experimenting with new languages, frameworks, application architectures, deployment tools, etc. It’s been Perl backed by MLDBM files and served via CGI, upgraded to mod_perl and PostgreSQL, statically generated and built out of a complex network of SSIs, ported to Python and TurboGears, then ported to Django. It’s run on a Linux box in my dorm room, various early hosting companies, Linode, and DigitalOcean VMs, EC2, a Kubernetes cluster, and Fly.io. Deployed via bash and rsync, Fabric, Jenkins, kubectl and Github actions, etc.
I actually strongly recommend that every developer have some kind of project like this. Something where you understand the domain well but can rewrite in different technologies or styles to get more experience with those technologies or styles than going through simple examples and tutorials. It needs to be small and contained enough that you can rewrite it in maybe a couple weekends or over a few weeks worth of evenings, not months of full time focus. But it needs to be large enough and complicated enough that you’ll run into some real, non-trivial problems. Bonus points for it being public or otherwise used by people other than you. I think this is a great way to evaluate those new languages, technologies, etc. in a much more meaningful way than reading documentation or going through basic tutorials that might not expose you to some of the messier aspects.
After porting this site (and a bunch of other personal apps as well) from Django to Phoenix, I’m certainly not an expert in Phoenix, but I’ve had to figure out all the basics, as well as getting a bit deeper into things to maintain existing URL structures, force Ecto, Phoenix’s “ORM”, into some unnatural contortions to support the database structure that had “evolved” over previous versions of the site, figure out how to do data migrations, automated zero downtime deploys, etc. Lots of things that wouldn’t be included in basic tutorials or that I’d have skipped over if I was just learning for fun because they’re a bit annoying. To actually use a technology in production though, those kinds of real world complexities are something you have to deal with and going through this kind of exercise gives me confidence that Phoenix is adaptable enough for production use.
Phoenix’s headline feature is LiveView which (IMHO) is one of the most exciting developments in web technology in the last decade, and provides a very promising alternative to the overcomplicated SPA mess that’s been bloating our industry. This site doesn’t use it (though I use it on other apps and love it). A blog just doesn’t need anything like that. Just good old dynamic server-side rendering of HTML is plenty (and if I didn’t still like the idea of using this as my test platform, I’d probably have switched to a static site generator long ago).
Even without using LiveView, I’m really happy and impressed with Phoenix.
-
Performance is great. I didn’t really have any problems with the performance of the Django version of this app (in the past, even without any kind of caching, it easily handled getting on the frontpage of HN and r/programming), and I didn’t bother benchmarking before/after, but it easily feels at least as fast as the Django version. (and, again, I haven’t yet bothered implementing any kind of caching whatsoever).
-
Performance is also great from the perspective of memory usage. I was running the Django version on Fly.io, and while it mostly worked on their 256MB free tier, it would occasionally leak enough memory that it would crash. That happened often enough that I was willing to pay a few bucks a month to bump it to 512MB, where it was perfectly stable again. I’m also running the Phoenix version on Fly.io and it easily runs in a 256MB container and doesn’t seem to ever leak memory or have any stability issues.
-
Elixir as a language is pretty nice. I’ve been dabbling in Erlang (which Elixir is built on top of) for a long time and I’m a bit of a weirdo in that I think I still actually prefer Erlang syntax to Elixir (an unpopular opinion). I also never really got into Ruby (prefering Python) and Elixir’s syntax is heavily influenced by Ruby. Still, it’s fine. Elixir has made genuine improvements in the usability/ergonomics around strings, macros, modules, and introduced some really wonderful syntax like the pipe operator. Elixir has also dragged the Erlang ecosystem into the world of modern tooling and packaging with
mix and hex. Critically, it’s done all that while keeping all of the best aspects of Erlang.
-
Phoenix overall has been proving itself to be a solid web framework. I’ve used a lot of web frameworks over the years and I’ve done a lot with Django. I feel like Phoenix has basically nailed all the basic architecture and features. There’s always a learning curve on a new framework, but I have yet to run into anything that I thought would be significantly easier in Django or some other framework.
-
Ecto, the “ORM” part of the stack in Phoenix, while it was definitely the part with the steepest learning curve (and I still feel like I’ve only barely grasped parts of it), is beautiful. I’ve never been an ORM hater (but I’ve used Hibernate, so I can see where the ORM haters are coming from), but Ecto feels like an evolutionary leap. I love Django’s ORM and have defended it in countless online arguments, but going back to it after using Ecto feels like a step backwards. This is one of those things that’s really hard to properly explain; you need to really spend some time with Ecto (and have a lot of experience with competing approaches) to get a feel for why it just feels like a better approach.
-
It’s not really relevant in this simple blogging app, but in other apps that I’ve been building with Phoenix that are a bit more complicated, the capabilities of the underlying Erlang/BEAM/OTP system to handle concurrency have let me vastly simplify the overall system. Eg, in a Django app, as soon as you need to do something outside the request/response cycle, you pretty much need to set up Celery, RabbitMQ/Redis, add a bunch of configuration so all the pieces can talk to each other, add a bunch of infrastructure to manage running and deploying and monitoring those other pieces, etc. In a Phoenix app, you just… spawn a process. Maybe push a message into a channel. You just don’t need all the other pieces and life becomes much simpler. (The simplification of converting a React/SPA frontend plus backend REST API to a single, integrated Phoenix LiveView app is even more impressive and liberating).
Of course, not everything is perfect. I have a few things that I’ve been less happy about. Some of them are probably just my personal taste combined with my lack of experience with Elixir/Phoenix, but I think they’re worth mentioning.
-
My partner is named Phoenix, so the name of the framework is particularly frustrating for me and makes for some confusing or awkward conversations.
-
On a superficial level, I don’t really like the template syntax, which seems roughly inspired by Rails’ ERB, which I also didn’t like.
-
It hasn’t been a dealbreaker, but I do miss Django’s approach to reusable apps and the ecosystem that has evolved there.
-
Related to that, Phoenix takes more of a code generation approach (again, presumably inspired by Rails). In Django, if I wanted to use some third party application/library, I’d add it to my dependencies, wire up a few settings in the project and basically be done; maybe overriding some templates or views if I wanted to customize something. In a Phoenix project, you add it as a dependency, run a
mix command that generates a whole directory full of code, then go in there and make any changes you want to that generated code. That’s way more powerful if you want to make a lot of changes/customizations since you have all the code right there and can just change it directly instead of figuring out how to use various hooks or callbacks. But it tends to really quickly bloat a project with code that is now part of your repository. More importantly, it makes upgrades much more difficult. I can’t just pull in a new version of that third party library and do some quick testing to make sure they didn’t change their API. Instead, the code generation step means I’ve effectively forked that library. So an upgrade now involves complicated diffs of hundreds or thousands of lines of code. At some point, I want to spend some time with Ash as it seems like that has most/all of the upsides of Phoenix with more of a declarative/library based approach.
-
It’s hard to really complain about this, but Phoenix’s APIs and architecture have been changing rapidly and not always in very backwards-compatible ways. On the plus side, they’ve been making improvements at a rapid pace and it’s clearly a thriving project, which is part of why it’s so exciting. But it’s also meant that a lot of online tutorials and documentation is out of date or misleading. The version of Phoenix described in Programming Phoenix, the book written by Phoenix’s lead developer, is basically unrecognizable now, with different directory structures and templating syntax, and didn’t even have LiveView, the feature that’s probably driving the most new people to the framework. Similarly, I preordered Programming Phoenix LiveView two years ago and its release has been pushed back repeatedly, I assume because LiveView has gone through so many major changes in that time and they don’t want to publish a book that’s already out of date at its first printing. It’s also really exacerbated by the code generation issue. Every time there’s a new version of Phoenix or one of the core libraries, I can’t just wait for the maintainer of a third party library to release a compatible update; I basically have to do it myself since I have all the code in my repo. It’s never been terribly hard, but I’m coming from Django, which while you can criticize for many reasons, has been doing an amazing job of maintaining stable APIs, clear deprecation paths, and backwards compatibility for like 15 years.
Overall, I’m really happy with Elixir and Phoenix and have been happily porting my Python and Django apps to it. I’m excited about the possibilities and expect to be building a lot more in the future. If you’re doing web development in any capacity, I think it’s worth looking into.
By
anders pearson
31 Jul 2023
Multiple times over my career, I’ve ended up writing a post similar to this on various internal blogs/wikis. I was about to write one yet again, so this time I thought I’d share it up here for a wider audience and maybe avoid having to rewrite this again in the future.
My first caveat is that this is all just my opinions. Take them for what they’re worth, which probably isn’t much. They are formed from a few decades of writing software on teams of various sizes and experience level in various domains and contexts and with outcomes across the whole range of success and failure. I will also include links to the thoughts of others who are probably smarter than me, have wider experience, and whose thoughts on these topics have helped shape my own.
My second caveat is that this is about code review and PRs in a team context. This isn’t about how those things are done on a public open source project. This is about reviewing your colleagues’ and coworkers’ code, not contributions from strangers, which requires an entirely different mindset. This is also an important point to keep in mind. Github’s PR concept and workflow was fundamentally designed around that open source contribution model and only later adapted to the more team-oriented context where it’s probably much more commonly used now.
Here’s my TL;DR: the closer you can get to true continuous delivery and trunk based development with non-blocking reviews and fast feedback cycles, the better. The value of code review lies more in communication and knowledge sharing than gatekeeping or quality control.
If you’ve read my recipe for reliability post, that’s probably not too surprising.
Now, I want to start with a few articles from others that I largely agree with:
If you only read my TL;DR and skimmed those, you might be thinking that I’m advocating against PRs and code review and for just merging everything to main and immediately deploying it to production. To some degree… I am…. Mostly, I just don’t believe that code review and PRs are particularly valuable or important for the purpose of maintaining quality compared to other factors.
If you compare Team A, with a high trust culture that empowers developers to own the production environment, do pair programming and TDD, and invest heavily in tooling for testing, integration, deployment, monitoring, and production observability but does zero code review and Team B, who does none of those things but has extremely thorough and exacting code reviews, I’ll bet on Team A to run circles around Team B, producing better quality, more reliable, more secure software faster and cheaper. They’ll beat them every day of the week on any reasonable engineering or business metric.
Of course that’s a false dichotomy. Zero code review might not be ideal even when you’re doing all the other things right. And doing thorough code review doesn’t necessarily imply that you can’t do the other things. Full trunk-based development and continuous deployment to production might not be fully compatible with your regulatory compliance requirements or some practical constraints. The point is more that at some point, a PR workflow or code review process that impedes on the feedback cycle starts to become a net negative on quality.
If what you want is high quality, safety, catching security issues early, etc. Code review will do some of that, but you will get much more value from improving the team culture, testing and deployment pipelines, static analysis tools, observability, etc. Basically, automation and tooling are going to get you a better return on your investment.
I also feel like I should make it clear that I actually really like reviewing code. I’ve long argued that reading code is a core skill that is largely ignored in our education and something that most developers should put effort into improving. You should get in the habit of reading as much of the code that you’re using as possible. Libraries, frameworks, and of course, your coworkers’ code. Building and maintaining this habit is, IMO, one of the main upsides of code review. Of course, that’s a benefit for the reviewer rather than the reviewee or the codebase.
Since PRs and code reviews are a necessary evil for many of us, the question changes from “should we use PRs and do code review?” to “how should we use PRs and do code review and get the most value out of it?”.
For practical advice, I’d start with this page: Code Review Developer Guide from Google’s Engineering Best Practices documentation. One nice thing about that resource is that it splits it up into a guide for reviewers and a guide for authors (the developer submitting the PR or (or CL in Google’s terminology)).
The most important part of that resource (IMHO), in the Standard of Code Review section is:
In general, reviewers should favor approving a CL once it is in a state where it definitely improves the overall code health of the system being worked on, even if the CL isn’t perfect.
…
A key point here is that there is no such thing as “perfect” code—there is only better code. Reviewers should not require the author to polish every tiny piece of a CL before granting approval. Rather, the reviewer should balance out the need to make forward progress compared to the importance of the changes they are suggesting. Instead of seeking perfection, what a reviewer should seek is continuous improvement. A CL that, as a whole, improves the maintainability, readability, and understandability of the system shouldn’t be delayed for days or weeks because it isn’t “perfect.”
Most everything else in the guide is either justification for why that is the standard, explanations of edge cases where it may not apply, and advice for how to apply that standard to your own code reviews and development process.
I’d even take that standard and generalize it a bit further as my own core principle, emphasizing the importance of frequent improvements and short feedback cycles as being preferable to longer feedback cycles and the pursuit of perfection.
That drives both how I create PRs and how I review them.
Things I try to do when creating a PR:
-
Make it as small and narrowly scoped as I possibly can. Ideally, only adding one feature, fixing one bug, etc. The whole thing should really be able to be summarized in one sentence. If I find myself writing “and” in the summary, I consider splitting it up. Google agrees and summarizes many of the benefits. A small narrowly focused PR is more likely to be correct, it’s easier to review, it’s easier to review properly (rather than a rubber stamp because the reviewer’s eyes have glazed over), and it can be either accepted or rejected atomically without adding extra work to split it up and rework.
-
I try to write a good description and summary that explains what it is for, any context around the work that a reviewer might need to be aware of, and highlight any areas that I am unsure of myself or that I think might look odd to a reviewer. Basically attempting to identify any criticism that they’re likely to have and preempt them.
-
I “self-review” the PR. Ie, I first go over the code and try to look at it as if I’m reviewing someone else’s code. Just seeing the code in a different context (eg, Github’s diff view rather than my usual editor) has been incredibly valuable. I’d honestly say that I’ve caught orders of magnitude more issues in my own code during this self-review step than reviewers have caught. This may be the strongest argument I can make for PRs and mandatory code review in terms of improving quality.
-
If there is any kind of automated test suite or linting available, I make use of it. Ideally, it should already be integrated into the PR automation.
-
If the reviewer sees that test cases have been added for the new functionality and that the test suite has run as part of the PR and passed, that preempts a lot of potential questions they might have about the correctness of the code. They can look for themselves at the tests rather have to go back and forth asking me about various edge cases.
-
If there’s anything potentially controversial about the PR, eg, architectural changes, I try to have a conversation achieve some consensus with the project/codebase’s stakeholders prior to the PR. That can be a formal decision doc or just a chat in Slack. I just don’t want to spring a surprise on them in the form of a PR. PRs and reviews should be about the implementation, not whether a feature or architectural decision is one that we want. Sometimes though, I have a hard time visualizing what the ramifications are of a change without actually just implementing it, so I might make a PR that does that. In those cases, I will make it clear in the description that it’s an experiment and often I’ll keep it as a
draft so we can discuss the change elsewhere, just using the PR as example code to keep the discussion grounded.
-
I make heavy use of Github’s “draft” status for PRs so I can make a PR, run the automated tests, look at the diffs to do my own “self review”, clean things up (often using git amend or squashing some history) and write a proper description and summary. Only once I’ve got things how I want them do I remove the draft status and tag reviewers. That should minimize the amount of noise they get.
With all of those, I’m largely trying to prioritize the reviewers’ time over my own. Reviewing PRs is part of our jobs and the reviewers are getting paid for it, but when I request a review from a coworker, it still feels to me like I’m asking them to do a favor and generally, if I’m asking someone to do me a favor, I want to make it as easy as possible for them.
On the other side, when I’m the one reviewing code, my goals are:
-
Fast turnaround. As mentioned multiple times previously, the speed of the overall cycle is really important. The faster code gets reviewed, the faster it can be deployed and we can begin getting value from its improvements and learning whether it was an adequate solution or needs additional work. I try very hard to complete any reviews assigned to me within a working day. Unless I’m dealing with a flat out emergency, reviewing code is a higher priority for me than pretty much any other work. I know from my own experience that if there are delays of days or weeks on a PR that I’ve submitted, I will often have forgotten a lot of the context for the PR. Most of us jump around a lot between codebases, projects, and features. You have to reorient yourself when you come back to something that you haven’t been working on recently. A PR that’s delayed by days or weeks is far more likely to have conflicts with other changes that have happened in the meantime and require re-working. Other times, it can be that the issue that the PR was fixing is no longer relevant, having been obviated by some other change. Of course, fast turnaround is far easier to achieve when the PRs are small, narrowly focused, well described, etc.
-
For large, complex PRs that will take a significant amount of time for me to review or do additional research before I can review it, or if I’m particularly busy with something else and won’t be able to get to it within a day, I try to make a note to let the submitter know that (and maybe encourage them to think about splitting it into smaller PRs).
-
I do not try to identify every possible issue with the PR and block it until it’s perfect. I’m generally asking myself whether the codebase as a whole will be in a better place with the PR merged than without. The goal of a code review isn’t to obstruct work, but to help it move forward. I do place extra scrutiny and higher standards on certain areas like security and data integrity though. An edge-case bug in a feature is something that we can fix in future PRs incrementally. Opening up a security hole or corrupting data is far more expensive to deal with later and worth slowing down development velocity to handle properly the first time. I’m also going to look more closely at changes that are in
customer facing critical parts of the code than, eg, internal tools. When I’m reviewing a PR, I’ll generally only block it if I think that it will actually break production or introduce some problem that has a high cost of reversing (eg, lost customer data, potential security breach, etc). If it’s just a matter of “this code doesn’t meet some arbitrary high standard for quality”, I’m much more likely to approve the PR and trust my teammates to address that in a follow up. This is as close to the “non-blocking” approach to code review as I can usually get.
-
I will still look for “low hanging fruit” though. If there are small changes that could be made, I’ll usually approve the PR but still suggest those changes. Github has a really nice bit of functionality for inline code suggestions that I use wherever possible; that makes it so the submitter only has to click a button to accept the changes. For other suggestions, I’ll usually leave it up to them whether they want to incorporate them into the current PR or merge it and address them in follow up PRs.
Again, no strict rules or formal checklists that I go through. My goal is to help improve the code and move things forward.
I have a fairly simple daily routine that I stick to:
-
One of the first things I do every morning to start my workday is pull up https://github.com/pulls/review-requested. That URL shows a list of any pending review requests. If you are reading this, look at your list. How many do you have? How old are they? What’s stopping you from reviewing them?
-
I usually open each of those in a new tab so I can go through them one at a time. Quick ones I deal with right away. Ones that look like they’ll take a bit longer, I save and then figure out when I’ll have time during my day to look at them properly or to let the submitter know that it might take me even longer.
-
Once I’m done with that first pass processing review requests, I click the bell icon in the top right, which should pull this up: https://github.com
/notifications?query=is%3Aunread. If you’re not in the habit of keeping your Github notifications at “inbox zero”, you might have thousands there. In that case, I recommend just accepting that old notifications are useless and clearing them all out. I clear mine out on a regular basis so the notifications are actually useful to me. I use it to keep track of whether there are new comments on reviews, whether my PRs have been approved, etc. I visit the notification page many times per day; basically any time I’m in between other tasks. It usually just takes a few seconds to acknowledge and clear them out.
-
Usually, but not always, before I leave for the day, I pull up the review requests list again. This time though, I’m only looking for ones that I can review very quickly. I’ve worked on remote teams distributed across multiple time-zones for almost the last decade so taking a couple minutes before I leave to unblock someone who might be just starting their workday can reduce their total latency by 8-12 hours and seems worth a little extra effort.
So that’s my approach. I hope it’s been helpful. Happy code reviewing!
By
anders pearson
01 Jul 2023
Reddit seems to be circling the drain right now so I’ve been going through my comment history there and archiving the ones that seem worth preserving. This one in particular has (IMHO) a decent explanation of some concepts around impedance matching applied to guitars, guitar pedals, and amplifiers that I haven’t seen summarized like this elsewhere, so I thought I’d post it here to make it easier to find. The comment was in response to a question basically asking “what is the difference between an overdrive pedal and a solid-state preamp?”
(I will also add a caveat that while I was once an EE student and studied this stuff, I haven’t really done any of that in about 20 years, so I may be out of date or fuzzy on some of this.)
A preamp generally serves several purposes. One is the EQ and distortion/overdrive. Importantly, though, it also turns an instrument level signal into a line level signal. A major part of that is getting the impedance right. To connect two pieces of gear with a minimum of signal loss/loading, you do “impedance bridging” which basically involves using a low impedance output (“source”) to drive a much higher impedance input (“load”); at least 10x ratio, usually higher. A passive guitar pickup will have an output in the 6-15kΩ range. A guitar amp’s input impedance is usually in the 1MΩ range. An amp is usually designed in two stages, the preamp and the power amp (though each of those might have multiple internal stages). If an amp has an effects loop, the loop is usually between those two stages. There aren’t hard and fast standards, but the common approach is to have the preamp stage produce “line level” output with a source impedance of 100-600Ω and the power amp input to also take “line level” input with an impedance of 10kΩ (though higher is also very common).
If you take your guitar and try to run it directly into the power amp stage, you’ll be potentially running a 10-ish kΩ source into a 10-ish kΩ load. If you’re lucky, the power amp input impedance will be higher (up into the 100kΩ range), but there’s no guarantee. If you run your guitar straight into a power amp or into the effects return of an amp, you’ll probably get a sound out, but it’s likely to be very quiet and probably not sound very good (important to note though that some amps convert to instrument level signal for the loop). That’s because the pickups are being loaded more than usual (which you’re mostly going to hear as a loss of high frequency) and because the power amp is expecting a much lower impedance source connecting to it.
Overdrive and distortion pedals don’t really have any kind of standard for input/output impedance either except that they are usually designed to go in between a guitar and an amp input, so they’re expecting to see a 6-15kΩ source connected to their input and a 1MΩ load connected to their output. A reasonable design would be for the pedal to have a 1MΩ input impedance and a 10kΩ output impedance. 1MΩ or higher is about what you’d expect from a pedal with a good buffer in it. There’s no real rule on the output side though and pedals can be all over the place. If a pedal is designed to be a “preamp” though, you would expect it to have a much lower output impedance, 1kΩ or lower.
Some distortion pedals have output impedances in that range. Eg, everyone’s favorite Boss Metal Zone has an output impedance around 1kΩ. That means that if you plug it into a line-level input like a power amp input or a line-level effects return, it will do a pretty decent job. Plenty of other pedals have much higher impedance outputs though. Eg, a Tube Screamer is more in the 10kΩ range. If you plug that straight into a power amp input, it’s not going to be ideal.
So, in a sense, yes an overdrive/distortion pedal can be essentially the same as a solid state preamp. But not always.
The other part of it is that since the preamp stages of most guitar amps add a significant amount of “flavor” in terms of distortion and EQ, overdrive and distortion pedals are usually designed with that in mind. Even if the impedance is right for using it as a preamp, if it wasn’t designed with that in mind, you might not like the results.
By
anders pearson
15 Apr 2023
Note: This is not an original idea from me. I definitely learned this term and concept from some book or blog post many years ago. I've been unable to find the original though, so I've written this up so I can reference it.
Automation is a major part of programming. Fundamentally, there’s nothing that a computer does that we couldn’t do manually given enough time. It’s just that computers can operate much faster, more precisely, and are tireless and without distraction.
So when we’re programming, we’re always just taking some manual process and automating it. Programmers spend an awful lot of time thinking about how we automate things, but it’s also important to think about what we automate.
An important antipattern related to the “what to automate” that I try to keep in mind is what I’ve heard called “Automating the Pain”.
Here’s a scenario as an example. Imagine that a company has an old manual process that involves Department A doing some work to generate a report from their own records or databases, printing out copies of that report, then that report gets sent to Department B, who need to take the data from that report, read it, and enter some or all of it into their own systems. Back in the day, this all may have happened via paper records in filing cabinets, forms filled in by hand, photocopies, and sent by post (or at least sneakernet). Now there’s probably less of that, but if you’ve spent any time in a large organization, you’ve almost certainly seen some version of this, probably involving Word documents or Excel spreadsheets being emailed around.
Programmers encountering a situation like that instinctively realize that much of that could be automated and are often eager to do so when given the chance. A first step might be just to switch to a paperless process where documents are emailed rather than printed out, mailed, entered back in, etc. That tends to make things faster and a bit more reliable (the poor data entry person can at least copy and paste instead of having to re-type) and will often be an improvement over the previous situation. They might then make improvements to the document formats to use standard fields that are easier to copy over from one system to another. Eventually, they might switch to web-based versions of both systems and automate the parsing.
The antipattern here is is that often these processes either shouldn’t exist at all or shouldn’t involve any human interaction and the automation work is just making a painful process a bit faster and less painful when instead we should be examining the entire system and eliminating or massively changing the process. Eg, why do Department A and Department B need to have separate copies of the same data, just in different formats and databases? In itself, that’s a recipe for inconsistency and errors. Maybe a better solution would be to set up a shared database that’s the single source of truth for the data that would’ve been sent back and forth and granting both departments the appropriate level of access to read and write to that database. Or maybe Department A is only getting the data first for historical reasons that are no longer relevant and instead the data should just go directly to Department B and bypass A altogether.
When I’m developing, I try to constantly ask myself that question: am I just automating the pain when I really should be automating away the pain?
I’m especially conscious of the antipattern when I find myself working on something that has some similarity to the above scenario, eg, if I’m serializing some data, transferring it somewhere, then deserializing it. But it also comes up often around legacy code. Eg, a workaround is introduced to deal with a bug in some library or system, then other code has to deal with the workaround. Eventually, the original bug is fixed or the system/library with the bug is no longer used. But the workaround remains and other code has to deal with it. Or some complicated part of the code was introduced to handle a particular integration or feature that was later removed. It’s easy for a developer who came onto the team later to spend a lot of time and effort improving that complicated code because they don’t realize that it’s actually no longer relevant and ought to just be removed completely. The common factors tend to be things like silos or handoffs between teams or developers, the interaction of multiple systems, and accretion over time with respect to changing requirements.
As a final thought, I do want to point out that while it’s an antipattern, there are also times when it is a perfectly valid option or even the best approach that can be realistically undertaken. Sometimes there are organization politics, legal restrictions, or market forces that prevent you from implementing the “right” solution. Or doing it “right” is a much harder, larger task and a little bit of automating the pain has a much better return on the investment. Other times, some basic automation can be a useful step towards the right solution, helping you get to a point where the right solution is more obvious. In any of those cases, I just think it’s worth acknowledging (and probably documenting) the tradeoffs you are making.
By
anders pearson
30 Jan 2023
I thought I’d share my “simple” recipe for building reliable applications. Of course “simple” doesn’t mean “easy”, but I think this is the core philosophy behind how I approach developing reliable software.
Here is the process:
-
A developer writes some code to make one improvement to the application.
-
That developer deploys that code to production.
-
That developer observes that new code in production to verify that it did what they expected and didn’t cause other problems.
-
That developer takes what they’ve learned in step 3 and goes back to step 1.
That’s it.
Anything that deviates from that feedback loop or slows it down will ultimately make a system less reliable and more prone to incidents and outages.
One obvious caveat on this process is that the developer involved has to actually care about the reliability of the system. I’m kind of taking that as a given though. I guess It’s possible for a developer to not care about reliability, but every developer I’ve ever met has at least not actually wanted to cause an outage.
Outages and incidents usually come from more subtle deviations from that process.
One very common mistake that we, as a profession often get wrong is not having the same developer who wrote the code do the deployment and the observation. That often also includes a related mistake where more than one change is developed or deployed at once.
A commit or PR should have a single purpose. The more different things you try to do at once, the harder the code/PR will be to understand, the more likely it is that errors will be introduced, the harder it will be to thoroughly observe the behavior of all the different changes once it’s in production to verify that it’s actually correct, and the harder it will be to connect something learned in that process back to the actual cause and use that to inform the next improvement. If you’ve spent any time debugging code, this should be intuitive. Writing a thousand lines of code implementing a dozen different features before running anything pretty much guarantees a painful debugging session and missed bugs.
Implementing a single feature or even just a single branch or logical part of a feature and testing it before moving on to the next makes it much faster to locate the source of a problem and to have some confidence that each line of code does what you think it does. As experienced developers, I think most of us recognize that having a single clear purpose is important not just for the unit of work (PR) but for the unit of code as well (function, class, module, service, etc). The more different responsibilities a single piece of code has, the more likely it is to have bugs and the harder it is to understand and to work on.
Google’s CL author’s guide agrees on that point.
The CL makes a minimal change that addresses just one thing. This is usually just one part of a feature, rather than a whole feature at once. In general it’s better to err on the side of writing CLs that are too small vs. CLs that are too large.
The other part of that is probably a more common mistake, but is related. That’s when it’s not the same developer doing all of the steps. If Developer A writes some code, then Developer B (or worse, Ops Person B), deploys it, B is usually not in nearly as good a position as A to properly check that it’s working as expected. It’s not always the case, but usually A, having spent the time writing the code, has a better idea of what it’s supposed to do, what it should look like if it’s working correctly, and what edge cases are most likely to cause problems.
These two are commonly connected. Multiple developers each working on separate improvements get their code bundled together and all deployed in a batch. That pretty much always means that there are multiple changes deployed at the same time, which again makes it harder to reason about problems and interactions, creates more surface area that needs to be checked, and when a problem is found, makes it harder to trace to one change and makes it more complicated to revert just that change.
I’ve occasionally mentioned that I’m not really a fan of “staging” environments as they are often used. There are advantages to having a staging site, but the downside is that they often become a chokepoint where multiple changes get bundled together and then are later deployed to production together, invoking the two above problems. I’ve seen many prodution incidents that started when there were a bunch of different changes that had been deployed to staging, that had been verified there to different degrees. Those then all got merged together and deployed to production. The developer merging and deploying (probably separate developers) didn’t have a full understanding of all the different changes or how to verify them after the deploy. Unfortunately, this is a very common problem with staging environments. There are legitimate uses for a staging environment, but I think that they are often overused and their downside needs to be considered, especially if they are forming this kind of chokepoint.
You may have noticed that “testing” isn’t one of the steps in the process before deploying to production. There are a couple reasons for that.
First, I consider automated tests to be part of both the “write the code” and “deploy the code” steps. The process of writing code should almost always involve running tests locally. Really, a good test driven development workflow is just a mini version of the whole process above, except without a deploy step. You implement a single small piece of functionality at a time and verify its behavior the best you can and then repeat. Step 2 of the process, “That developer deploys that code to production.” doesn’t mean that the developer manually copies code out to the production servers; it means that they initiate an automated deployment pipeline, either by clicking a “deploy” button somewhere or merging a PR to trigger the deploy. The deployment pipeline should be running tests, possibly at multiple levels (unit tests, integration tests, post-deployment smoke
tests) and fail as soon as any of them fail.
A more controversial reason I didn’t explicitly include a testing step is that while I love tests, I actually don’t think they’re as directly important to the reliability of a site. Good automated tests allow a developer who cares about the reliability of the site to make changes to the code and verifythose changes more rapidly. They allow the deploy step to run more safely (so less time spent debugging or fixing broken deploys). My experience is that if a hypothetical Team A writes no tests at all but otherwise cares a lot about site reliability and follows the process above, the result will be a more reliable site than Team B, who write a lot of tests but implement large changes, don’t deploy those changes individually, deploy infrequently, and don’t focus on observing the changes in production. Team A might start off worse, but they’ll learn a lot more, have a deeper understanding of how their code actually runs in production, and be able to build something that’s more reliable in the long run.
Steps 3 and 4 where the developer who implemented a change closely observe that code in production and learn from it are perhaps the key to the whole approach. This is why I tend to put so much emphasis on metrics, monitoring, logging, and observability tools. You usually can’t just see inside a running process in production, so you have to have tools in place to collect and process useful data. This is also why, while I can put a lot of those tools in place, at some point, the developers writing the code need to pick them up and use them. They are the ones who will be in the best position to know what data will help them verify that a feature is working like they expect or to understand what’s happening when it behaves differently in production than they expected. The developers will have assumptions about how often a given function is called, how long
a database call should take to execute, which calls might fail, what sorts of values will be passed as parameters to a function, etc. Production traffic and end-user behavior often prove our assumptions wrong in startling ways. Uncovering those wrong assumptions quickly and correcting them is key to making a reliable site. One of the best things a developer can do is to cultivate a deep curiousity about what their code is really doing in production.
It’s also important to keep in mind that the success is greatly affected by the speed of the whole process. Each time you go through it, you should learn something. The more times you go through it, the more you learn and the more you can improve.
If the process, or steps in the process are slow or difficult, that limits how many times you can go through the cycle. A large codebase that takes a long time to navigate and slow tests make the development step slower. Slow deployment pipelines obviously make the deploy step take longer, but that’s also slowed by not having zero downtime deployments, forcing you to only be able to deploy during certain, infrequent windows (this also again makes it much more likely that you’ll end up deploying multiple changes at the same time). Not having good observability tooling makes it slower to verify the change in
production. In addition to allowing fewer iterations, any slowness in the process also reduces reliability because the more time that passes between writing code and observing it in production, the more difficult it will be for the developer to really remember the full context of the change and properly verify it.
We often have additional steps in our workflow that serve purposes other than reliability and must be there. But we need to minimize their impact on the overall process. Eg, if you have compliance requirements (eg, SOC 2, PCI, ISO, etc) you probably have to have code reviews for security. Even without compliance requirements, code reviews are good (though I would argue that their importance has always been less about catching bugs or improving reliability and more about ensuring that other developers are aware of or understand the changes and maintaining common standards for our codebase). But it’s very important that turnaround time on code reviews is kept short to avoid slowing down the entire process. (of course, it’s equally important that we keep PRs small and single-purpose so the reviewers can do meaningful reviews quickly). It’s also important to lean on automation as much as possible to keep that part of the process fast and efficient.
Finally, it’s also worth mentioning that the importance of this process isn’t limited to just application code. When I’m working on infrastructure, my goal is to go through this whole cycle with Terraform config, ansible roles, etc.
This post has contained a lot of my opinions. I expect that not everyone will agree with me on many of these. I will note though that what I advocate for is pretty close to the recommendations that you will see in, eg, Charity Majors’ twitter feed, Dave Farley’s Modern Software Engineering or the DORA Report, which studies software development at a large scale. In particular, DORA are interested in what makes a “high functioning organization” and the four key metrics that they’ve found to be the most reliable predictors are 1) lead time for a change (how long it takes to get from an idea to that change being running in production and available to customers; shorter is better) 2) deploy frequency (how many times per day/month/etc. you deploy or release to end users; more often is better) 3) time to restore (if there’s an outage, how long does it typically take to fix; shorter is better) and 4) change fail percentage (what percentage of your changes/releases resulted in an incident; lower is better). The first two of those are obviously directly related to the approach I describe and I think an argument could be made that it helps with the latter two as well.
See also: my post about Ratchets.
By
anders pearson
03 Dec 2022
I have a couple old related blog posts here: Continuously Deploying Django with Docker (2015) and Continuously Deploying Django with GitHub Actions (2019). They describe my approach (at the time) to deploying Django apps on a simple cluster of servers, achieving continuous deployment with zero downtime and some basic failover and scalability capabilities.
At the end of the first one, I say:
Nevertheless, what I’ve put together is basically a low rent, probably buggy version of a PaaS. I knew this going in. I did it anyway because I wanted to get a handle on all of this myself. (I’m also weird and enjoy this kind of thing). Now that I feel like I really understand the challenges here, when I get time, I’ll probably convert it all to run on Kubernetes or Mesos or something similar.
And, several years later, I feel like I should probably mention that yes, I did actually just convert it all to run on Kubernetes. That was actually quite a while ago, but I’ve been lazy about blogging.
Since I got a lot of positive feedback on the previous posts, I figure I ought to write up my Kubernetes setup as well in the hopes that people find that useful.
Let’s talk about Kubernetes really quickly first. I should stress that I am, by no means, a Kubernetes expert. I’ve gone through the exercise of setting up and running a cluster manually. As a learning exercise, I highly recommend doing that. If you’re actually going to run a Kubernetes cluster with production workloads I only recommend going that route if you plan to invest a significant amount of time in becoming a Kubernetes expert. Kubernetes has a reputation for complexity and it’s deserved when it comes to building, operating, and maintaining a cluster. Just deploying an application to a Kubernetes cluster that someone else is responsible for operating is actually quite simple though. These days, there are a number of options for managed Kubernetes clusters that you can just pay for. I have experience with GKE and DigitalOcean Managed Kubernetes and can recommend either of those. I’m sure the equivalent offerings from AWS, etc. are also fine; I just don’t have experience with them.
The setup I’ll describe for my personal apps here uses DigitalOcean Kubernetes. I’ll point out a few things that are specific to that, but most of it will be pretty generic.
For the most part, the underlying Django applications are still structured the same and packaged individually as Docker images pretty exactly as described in the previous blog posts. The actual Dockerfiles, python dependencies, etc. have all been updated over the years to more modern approaches, but the end result is still an image that is more or less a black box that takes its configuration from environment variables (à la 12 factor apps. Kubernetes just runs docker containers, so I really didn’t have to change the apps to run them there.
Again, I’ll use my RSS feed reader app, “antisocial”, as the example and go through its configuration. That’s because it has both a web component as well as Celery workers and Celery Beat, which also need to run. That’s the most complicated one I have. Other apps that don’t need Celery or Celery Beat are basically the same, but even simpler than what I’ll show here.
My DigitalOcean Kubernetes cluster is pretty small, just three nodes with enough RAM to handle all the apps I want to run on them. Again, I aim to have at least two instances of the web component running behind a load balancer for basic failover and to allow for zero downtime deployments. With three nodes in my cluster, I want it to be able to keep serving traffic even if it loses one node. If this were for production workloads and not just my personal apps that don’t really need high availability, I’d set up a larger and more redundancy. For my personal apps though, I need to keep the costs reasonable.
The apps all use a shared managed PostgreSQL instance (again, run by DigitalOcean) and serve static files via AWS S3 and CloudFront. So the Kubernetes cluster is just handling the actual Django web apps and Celery workers as well as a RabbitMQ instance that connects them.
Kubernetes has a number of abstractions that we’re going to have to look at. I won’t go into great detail on each, since there are better resources out there for learning Kubernetes. Instead, we’ll just look at how they are set up for this Django app and how they fit together.
Another quick note: Kubernetes has a bunch of features like namespaces and RBAC that let you secure everything and prevent applications running on the same cluster from accessing each other (accidently or maliciously). Since this is all just my personal side project stuff, I’ve skipped as much of that as I can. If you are going to use Kubernetes for production, really need to go learn that stuff and understand it first.
Pretty much everything in Kubernetes is just defined in a YAML file. You then (after setting up some auth stuff that I won’t cover), interact with your cluster by running kubectl apply -f some_file.yaml. Kubernetes reads the defnition of whatever you are creating or updating in that file and updates the cluster to match it. Yes, you quickly get a bit overwhelmed with the amount of YAML involved and how verbose it can be, but you get used to it and the consistency of the interface is pretty nice.
The first thing we need for the app is a Service, which is just an abstraction for an application that will be running and accessible on the internal network. So, we have service.yaml like:
----
apiVersion: v1
kind: Service
metadata:
  name: antisocial
  labels:
    app: antisocial
spec:
  type: NodePort
  selector:
    app: antisocial
  ports:
    - port: 8000
      targetPort: 8000
      name: gunicorn
All that’s really doing when we run kubectl apply -f service.yaml is setting up some routing information to let the cluster know that there’s some “antisocial” application that will be exposing “gunicorn” on port 8000. We’re not actually running anything yet.
The next thing we need is configuration for our applications. In my old setup, I could deploy config files and put environment variables into Systemd/upstart configs as needed. Since you don’t typically have access to the servers in a Kubernetes cluster, you need a different approach. Kubernetes provides a ConfigMap abstraction which is just bundle of key/value pairs. We make one for the app in configmap.yaml:
---
apiVersion: v1
kind: ConfigMap
metadata:
  name: antisocial-config
data:
  DB_HOST: "....db.ondigitalocean.com"
  DB_USER: "antisocial"
  DB_PORT: "25060"
  AWS_S3_CUSTOM_DOMAIN: "....cloudfront.net"
  AWS_STORAGE_BUCKET_NAME: "thraxil-antisocial-static-prod"
  ALLOWED_HOSTS: ".thraxil.org"
  HONEYCOMB_DATASET: "antisocial"
Any other settings that we need could be added there. Again, a simple kubectl apply -f configmap.yaml and it’s built in the cluster.
A bad approach would be to put sensitive data like passwords or the django secret key into the ConfigMap. It would work, but isn’t recommended. Instead, Kubernetes also has Secrets which are very similar to ConfigMaps but, as the name implies, intended for secret and sensitive values. There are a bunch of different ways to set up and manage secrets. The approach I took was to have essentially an .env file called secrets.txt with just key/value pairs for the secrets like:
SECRET_KEY=....
DB_PASSWORD=....
AWS_ACCESS_KEY=...
AWS_SECRET_KEY=...
And so on. Then I do kubectl create secret generic antisocial-config --from-env-file ./secrets.txt to load them into the cluster.
So, we have a Service, and configuration split into the secret and non-secret parts. Now we are ready to actually connect those up and run our application.
Kubernetes does that, along with some more information about the steps involved in spinning up your services in a Deployment. It’s a bit of a weird abstraction at first, but quickly became one of my favorite aspects of Kubernetes once I understood it. The Deployment defines the complete desired state of the application along with enough information for the Kubernetes cluster to figure out how to achieve that desired state no matter what state it starts out in.
Let’s start by just looking at the Deployment for the web app part (ie, gunicorn) without any of the Celery stuff:
---
apiVersion: apps/v1
kind: Deployment
metadata:
  name: antisocial-app
  labels:
    app: antisocial
spec:
  replicas: 2
  selector:
    matchLabels:
      app: antisocial
  template:
    metadata:
      labels:
        app: antisocial
    spec:
      affinity:
        podAntiAffinity:
          preferredDuringSchedulingIgnoredDuringExecution:
          - weight: 100
            podAffinityTerm:
              labelSelector:
                matchExpressions:
                - key: app
                  operator: In
                  values:
                  - antisocial
              topologyKey: kubernetes.io/hostname
      containers:
        - image: <IMAGE>
          name: antisocial
          envFrom:
            - secretRef:
                name: antisocial-secret
            - configMapRef:
                name: antisocial-config
          ports:
            - containerPort: 8000
              name: gunicorn
The last part of that is actually a good place to start. That specifies the container that’s going to run, gives it the name antisocial, sets up an environment from the ConfigMap and Secrets that we defined, and tells Kubernetes that those containers will be exposing port 8000 with the name gunicorn, which lets it associate those container/ports with the abstract Service that was defined way back at the beginning. The -image: <IMAGE> line we’ll come back to later.
The replicas: 2 line tells it to run two instances of this container. Then, the whole podAntiAffinity: block basically tells Kubernetes to do its absolute best to run those two instances on different physical nodes (the underlying servers). Having two instances running doesn’t help us much for failover if they’re running on the same node and that node goes down. “Anti-affinity” is Kubernetes’ way of letting you avoid that, while also letting Kubernetes otherwise have complete control over which containers run on which nodes without you having to micro-manage it.
The other wonderful thing about that config is that by default Kubernetes does a rolling deploy with zero downtime. When a new image gets deployed, it spawns instances of the new version and waits until they’re running before moving traffic over to them and only then shutting down the old ones. If you define health check endpoints in your containers, it will wait until the new ones are actually able to handle traffic. If you want to get really fancy, you can replace the health checks with more complicated checks that, eg, look at external metrics like error rates or latency and you can configure it to roll out the new version in small steps, only continuing if those metrics look good (ie, canary deploys).
The Celery Beat Deployment is very similar:
---
apiVersion: apps/v1
kind: Deployment
metadata:
 name: antisocial-beat
  labels:
    app: antisocial-beat
spec:
  replicas: 1
  selector:
    matchLabels:
      app: antisocial-beat
  template:
    metadata:
      labels:
        app: antisocial-beat
    spec:
      containers:
        - image: <IMAGE>
          name: antisocial
          command: [ "/run.sh", "beat" ]
          envFrom:
            - secretRef:
                name: antisocial-secret
            - configMapRef:
                name: antisocial-config
The differences, aside from it being labeled “antisocial-beat” instead of just “antisocial” are that it only has one replica (you don’t want more than one Celery Beats instance running at once), no ports are exposed, and it adds the command: ["./run.sh", "beat"] parameter which tells the docker container to run the beats service instead of gunicorn.
It’s slightly more complicated with the Celery Workers:
---
apiVersion: apps/v1
kind: Deployment
metadata:
  name: antisocial-worker
  labels:
    app: antisocial-worker
spec:
  replicas: 1
  selector:
    matchLabels:
      app: antisocial-worker
  template:
    metadata:
      labels:
        app: antisocial-worker
    spec:
      initContainers:
        - image: <IMAGE>
          name: migrate
          command: [ "/run.sh", "migrate" ]
          envFrom:
            - secretRef:
                name: antisocial-secret
            - configMapRef:
                name: antisocial-config
        - image: <IMAGE>
          name: collectstatic
          command: [ "/run.sh", "collectstatic" ]
          envFrom:
            - secretRef:
                name: antisocial-secret
            - configMapRef:
                name: antisocial-config
        - image: <IMAGE>
          name: compress
          command: [ "/run.sh", "compress" ]
          envFrom:
            - secretRef:
                name: antisocial-secret
            - configMapRef:
                name: antisocial-config
      containers:
        - image: <IMAGE>
          name: antisocial
          command: [ "/run.sh", "worker" ]
          envFrom:
            - secretRef:
                name: antisocial-secret
            - configMapRef:
                name: antisocial-config
It’s basically the same approach as Celery Beat, but adds the whole initContainers block. That defines containers that should be executed once at initialization. In this case, it runs “migrate”, “collectstatic”, and “compress” commands in sequence before starting the Celery worker, which then stays running.
YAML files can be concatenated together into a single file, so all three of those parts go into deployment.yaml. Running kubectl apply -f deployment.yaml will then actually bring everything together and give us a setup with the Celery worker and beats process running, and two gunicorn processes running on different nodes in the cluster. If a node in the cluster goes down, Kubernetes knows what was running on it and will do its best to replicate those containers to other nodes and update the internal network routing to send traffic to them. If containers crash, it will restart them to ensure that the desired number of replicas are always available. If the cluster is expanded, Kubernetes will spread the load out across them as best it can.
Deploying to the cluster is ultimately done by running kubectl apply -f deployment.yaml after updating the -image: <IMAGE> lines in the config to point to a new version of the docker image.
A simple GitHub actions workflow can do that:
on:
  push:
    branches: master
name: deploy
jobs:
  buildDockerImage:
    name: Build docker image
    runs-on: ubuntu-latest
    steps:
    - uses: actions/checkout@master

    - name: Build docker image
      run: docker build -t thraxil/antisocial:${{ github.sha }} .

    - name: docker login
      run: docker login -u $DOCKER_USERNAME -p $DOCKER_PASSWORD
      env:
        DOCKER_USERNAME: ${{ secrets.DOCKER_USERNAME }}
        DOCKER_PASSWORD: ${{ secrets.DOCKER_PASSWORD }}

    - name: docker push
      run: docker push thraxil/antisocial:${{ github.sha }}

    - name: Update deployment file
      run: TAG=$(echo $GITHUB_SHA) && sed -i 's|<IMAGE>|thraxil/antisocial:'${TAG}'|' $GITHUB_WORKSPACE/deploy/deployment.yaml

    - name: Install doctl
      uses: digitalocean/action-doctl@v2
      with:
       token: ${{ secrets.DIGITALOCEAN_ACCESS_TOKEN }}

    - name: Save DigitalOcean kubeconfig with short-lived credentials
      run: doctl kubernetes cluster kubeconfig save --expiry-seconds 600 k8s-1-20-2-do-0-nyc1-....

    - name: Deploy to DigitalOcean Kubernetes
      run: kubectl apply -f $GITHUB_WORKSPACE/deploy/deployment.yaml

    - name: Verify deployment
      run: kubectl rollout status deployment/antisocial-app
The beginning of that is the same as before, whenever we merge to master, it builds the docker images (which runs the unit tests), tags it with a git SHA1, and pushes that up to the docker hub. A small extra new step is that it then also does a quick sed to replace all occurrences of <IMAGE> in the deployment.yaml file with the newly created and pushed docker image + tag.
Then it’s a little bit DigitalOcean specific where it authenticates to my cluster.
The actual deploy happens with kubectl apply -f ... deployment.yaml. The next step, kubectl rollout status deployment/antisocial-app isn’t strictly necessary but is a nice feature. That just waits until the cluster reports back that the deployment has succeeded. If the deployment fails for some reason, the GitHub Actions workflow will then be marked as a failure and it’s much more noticable to me.
There’s a final piece that I do need to mention. What’s been covered above gets the application running, but at some point, you need to actually expose it to the rest of the internet on a public interface. Kubernetes refers to this as an Ingress. There are a ton of different ways to do Ingress. It’s common to use Nginx, Traefik, Caddy, HAProxy, or other common reverse proxies or load balancers for ingress, especially if you are running your own cluster. For managed clusters, it’s also common for providers to make their own managed load balancer services available as Kubernetes Ingress. Eg, AWS ELB, GCP HTTPS Load Balancers, etc. Digital Ocean does the same with their load balancer. If you’re using a managed Kubernetes cluster, you probably also want to use the managed load balancer. I’m not going to cover my ingress setup here because it’s specific to the DigitalOcean setup and I will instead just recommend that you follow the instructions for your chosen provider. One nice aspect of pretty much all of them is that they make SSL certificates pretty seamless to manage. If the provider’s ingress doesn’t handle certificates itself, you can use cert-manager with your Ingress. I’ve found it much easier to deal with for Letsencrypt certificates than the standard certbot approach.
Finally, if you’ve read this far, I have a secret for you: I already don’t use this setup. Yeah, by the time I got around to writing up my Kubernetes setup, I’d already moved on to a different approach that I like even better for my personal side projects. I’ll try to be faster about writing about that setup, but no guarantees. In the meantime, I do still recommend a similar approach to Kubernetes, especially if you want that failover and scalability. I’ve barely scratched the surface here of what Kubernetes is capable of as a platform that you can build on. I know it’s an intimidating amount of abstract concepts and YAML when you first encounter it. But compared to a similarly (honestly, much less) capable setup like the previous one I had with VMs running docker and systemd, custom configuration management tools, a consul/etcd cluster, registrator, consul-template, and a bunch of shell scripts for deployment, it really is simpler to deal with. It’s pretty amazing to go into the cluster management console, delete a node, and watch Kubernetes automatically move things around to the remaining servers without dropping any traffic.
By
anders pearson
26 Nov 2022
One of my favorite all-purpose engineering tools (maybe it’s more accurate to call it a “technique”, but I’m going to stick with “tool” here) is the ratchet.
In my career, I’ve had the benefit of some very long tenures at different organizations. I and teams I’ve worked on have launched new greenfield projects, I’ve maintained some codebases for more than a decade, I’ve done big bang rewrites and piecemeal migrations. I’ve worked with experienced and talented developers and complete newbies. I’ve also inherited a lot of code and systems. Some of those have been well designed, well tested, and well documented. Others have been… not so much those things.
I’m not dogmatically against rewrites. Sometimes that’s the appropriate solution. Often though, it’s not practical or feasible to rewrite a large codebase or existing system even if it’s in terrible shape. It needs to be improved in place. The thing with systems that are already in bad shape is that making changes is risky. The larger the change, the riskier. It’s often clear that the current state of things is bad, but you don’t know exactly what “good” would look like or how to get there from where you are.
This is where the ratchet comes in.
A ratchet is two parts:
-
any small change that improves the codebase or the system in some way.
-
some safeguard that locks that change in place.
Fix a bug? Add a regression test to make sure the bug stays fixed. No automated tests at all? Add a “dummy” test suite that runs zero tests. Obviously that won’t catch any bugs by itself, but it should be low risk to introduce (you’re just adding test harnesses) and when you do start adding tests, you’ll have the scaffolding there to fit them into. Set up a commit hook or Github action to run the dummy test suite. Again, it shouldn’t introduce any risk but will get everyone accustomed to seeing tests pass as part of the development cycle. I’ve seen dummy test suites like this catch syntax errors or broken imports in code just by virtue of ensuring that the code is at least parsed and compiled before getting pushed out to production (we’ve all seen developers make “just a tiny change” and push without even running it locally; if we’re honest, most of us have done that ourselves).
Is the code all over the place in terms of conventions? Add a simple linter tool (eg, flake8 or eslint). Most of them will let you enable/disable different rules. If you need to, start out by disabling every single rule so that it’s not actually checking anything, but add it to the commit hooks or CI setup. Then you can enable one rule at a time later on as you gain confidence that they aren’t breaking anything. Each rule that gets enabled prevents the codebase from ever having that problem again. Eventually, you might make enough progress that you’re comfortable switching to an automatic formatter like black or go fmt or similar.
Is a deploy process manual, slow, and error prone? Write a Runbook entry documenting it as well as you currently understand it. Then start automating parts of the runbook. Add a simple end to end “smoketest” at the end of the deploy to verify that the deploy was successful. Before you know it, you’ll have a completely automated deployment process.
None of these are revolutionary ideas. I just find it useful to think in terms of this “ratchet” mechanism when I’m improving a codebase, a system, or even a team’s process. Make lots of small steps and make it easier for the system to naturally move towards a “better” state than a worse one. At some point the system dynamics take over and become self-reinforcing.
By
anders pearson
30 Dec 2019
For the last few years, at the end of the year, I’ve been posting my roundup of new music for the year. I’m a little bored with that for now and thought that this time, I’d list the books I read this year and maybe some brief thoughts on them.
According to my Amazon order history, the first book I bought in 2019 was Hacking: The Art of Exploitation, 2nd Edition. I’d generally avoid anything with the word “hacking” in the title, but somehow this was recommended to me and I’m glad it was. It does a surprisingly good job of explaining basic exploitation techniques like buffer overflows, format string vulnerabilities, and shell code. The kind of stuff I used to read about in text files on usenet but never really got too far into. It reminded me that I really haven’t thought much about assembly and machine code since university. Back in those days, my exposure was mostly writing MIPS and Z-80 assembly and I never really bothered with x86. That led me to pick up Assembly Language Step-by-Step which isn’t terribly modern, but does a good job covering x86 assembly. Wanting to shore up the connections from assembly all the way to higher level languages, I also read Low-Level Programming: C, Assembly, and Program Execution on Intel® 64 Architecture, which was excellent. Its coverage of assembly isn’t as thorough, but it gets much more into those weird bits of compiler and linker magic that I’ve long avoided having to deal with. Later in the year, I ended up getting The Apollo Guidance Computer: Architecture and Operation and I absolutely love it. I’m an old space nerd (aren’t we all) and this is a fascinating look at the computer guidance system on the Apollo, including the hardware, the software, and some math and physics tricks they used to pull everything together.
I stumbled on Introduction to the Theory of Complex Systems at a bookstore and couldn’t resist it. It goes into network theory, evolutionary algorithms, statistical mechanics, and ties together ideas from mathematics, physics, biology, and social sciences. If you know me, you know that I’d be all over that. Afterwards, I wanted more and I’m pretty sure that The Road to Reality: A Complete Guide to the Laws of the Universe came up as a recommendation somehow. If you didn’t know, I was a physics major for most of my undergrad before switching to electrical and then computer engineering. This is the book that I wish I’d had when I was struggling through my physics classes. It doesn’t go deep into any of it, but Penrose explains so many of the concepts with a clarity that was definitely missing from my classes and textbooks. I’m not sure it would be that understandable without at least some basic college physics and math background, but if you ever took a general relativity or quantum mechanics class and felt like you didn’t really get it, this is definitely worth checking out.
That kind of got me thinking about those concepts in those physics classes that I’d learned to use but never really felt like I understood. As a physics major, you don’t necessarily have to take a lot of math classes, and there are a lot of things that get introduced in your physics classes as tools but aren’t really explained that well. Back when I was in school, we didn’t have Wikipedia or Youtube or Amazon (and I certainly didn’t have disposable income to spend on expensive math books that weren’t required for my classes) so unless you took a class on a topic or knew someone with that expertise, it was hard to fill in those gaps. By the end of my physics classes, I remember feeling like I was solving problems by pattern matching and mechanically applying memorized solutions and could get the right results but I no longer really knew what was going on. A few of the important ones that I definitely missed out on were tensors and topology. We used tensors plenty in physics classes, but I remember mostly just thinking of them as multi-dimensional matrices and a set of mechanical rules that you used to manipulate subscripts and superscripts in a way that let you do higher dimensional calcuations without having to write out a million terms. Every once in a while a professor would do something weird with them and we’d just have to take it on faith that it was valid, but it always left me feeling like there was a lot more that I didn’t understand.
This realization that I could now fill in those gaps led me down another rabbit hole of math books that occupied quite a bit of my year. I started with some youtube videos and various online resources that helped a lot. Then I picked up Tensor Calculus because some of those Dover books are inexpensive hidden gems. This one wasn’t. It might be fine if you are more of a mathematician, but I’m still fundamentally coming at things from a physics/engineering perspective and not that interested in proofs and derivations. The one that was much better for me was An Introduction to Tensors and Group Theory for Physicists. The preface basically described my exact situation of “lingering unease” around the concept and does a great job of filling in the blanks. It also made connections to group theory that I hadn’t really thought about. Group Theory comes up more often in computer science and is something I feel more comfortable with but it did remind me that I never actually took an Abstract Algebra class. I was also vaguely aware that despite seeming like it should be unrelated, Topology is pretty heavily based on Abstract Algebra and that was another topic that I wanted to fill in. So I got A Book of Abstract Algebra. That one I think does fall into the “hidden gems” category of Dover books. Highly recommended. I followed it up with Introduction to Topology which was… ok. It was clear enough and I could follow it, but it was pretty dry and I don’t feel like I gained any real insights from it. I didn’t come away from it thinking that Topology was amazing and having a different perspective on things. I just kind of feel like now I know a bunch of definitions and theorems. I also got Counterexamples in Topology which was highly recommended and I can see being a valuable reference, but it’s really not one that you just sit down and read cover to cover. Somewhere in the middle of my Dover math books spree, I also read Geometry, Relativity and the Fourth Dimension which was pretty shallow but a very quick and fun read.
The last math book I picked up that’s worth mentioning is Mathematical Methods for Physics and Engineering: A Comprehensive Guide. This is another book that I wish had existed when I was an undergrad. It’s big and extremely thorough. It basically covers all of the math you would need for an entire physics or engineering undergrad education. I really can’t think of a single mathematical concept, tool, or technique that I encountered in my undergrad physics and engineering that isn’t covered in it. For any given topic, there’s probably a better introduction or a more thorough treatment in some other book, but I’ve never seen any other book with the same breadth. It’s become my goto math reference and lives on a shelf by my desk now.
As a “palate cleanser” during my math refresher, I read The Poetics of Space which has been on my recommendations list for years and come up in numerous conversations. I don’t feel like I got as much out of it as I could have because I’m just not that familiar with the french poetry that he bases his discussions off of. I’m sure it’s one of those books that really needs to be read in its original French, but even in translation, it’s beautifully written and evocative.
I’ve been vegan for a while but only recently thought to actually read anything on the topic. Why We Love Dogs, Eat Pigs, and Wear Cows: An Introduction to Carnism is probably the best introduction to the ethical and moral philosophy behind veganism and animal rights. The Sexual Politics of Meat: A Feminist-Vegetarian Critical Theory makes a strong case for veganism as an important part of intersectional feminism. It was written in the 90’s though and both veganism (eg, at the time “vegan” wasn’t a commonly used term, so it only talks about “vegetarianism”) and feminism have changed quite a bit since then, so it needs to be read with that in mind. One chapter jumps right into fairly graphic descriptions of sexual violence without any warning, so that’s something to be aware of. On a completely different axis, How Not To Die: Discover the foods scientifically proven to prevent and reverse disease, while not explicitly “vegan”, is a great scientific look at nutrition from the doctor behind nutritionfacts.org and supports a vegan diet as at least a good starting point for avoiding many of the diseases and causes of mortality that plague the modern world.
I’ve been living in London for a few years now and in 2020, Phoenix and I become elligible for Indefinite Leave to Remain. Our main obstacle is passing a test that involves knowledge of British history, culture, and government. There’s an official guide, Life in the United Kingdom that covers everything that could be on the test along with practice tests and I’m pretty sure I could pass the test by cramming those for a bit. But I’ve got plenty of time and if I’m going to be living here long term, I figure I might as well know a bit more. Also, if you hadn’t noticed, the last few years have been pretty eventful in British politics and have exposed much of the world to the idiosyncratic and confusing way that very important decisions are made over here. In an effort to understand how these things work and the historical context behind them, I have been going through some “very short introduction” books to build up some background knowledge. So far I’ve gone through The British Empire, Nineteenth Century Britain, Twentieth Century Britain, The British Constitution, and British Politics. I’ll probably read a bunch more before I’m done.
Those books all fit into various themes or categories. In between them were a bunch that were pretty random:
Finally, the one piece of fiction I managed to read this year (to be fair, I read a lot of fiction in 2018, so I was taking a bit of a break on purpose) was Into the Dark (Dark Devices Book 1), which happens to have been written by my coworker. He wrote it for NaNoWriMo and self-published, which I strongly support. It’s not very long and leaves the story set up for future continuation, but it’s a nice fantasy read and reminds me of a slightly sci-fi’d up take on old D&D Underdark books.
By
anders pearson
12 May 2019
[Edit 2019-09-21: Updated with the new YAML syntax]
A couple years ago, I wrote a post covering how I set up a continuous deployment pipeline for my personal Django apps using Docker and Jenkins.
A lot has changed since then so I thought it was about time I updated. Especially since this weekend I switched from Jenkins to GitHub Actions.
So, a quick disclaimer before I go on: GitHub Actions is currently in public beta. They have been clear that it is not yet considered stable for production and comes with no warranty. It could change and break my setup at any time. They also haven’t released any information about what it will cost when it is fully out. These are my personal apps so I’m fine with all of that. I’ll try to remember to update this post when the beta is over, but in the meantime, use it at your own risk.
My old post covered the basic setup and, honestly, the general approach hasn’t changed much; I’ve just been swapping out the pieces. It’s worth reading the old post for more details, but I’ll recap the basic approach here so the rest of this post can just cover the new GitHub Actions stuff.
-
I’m still packaging Django apps up in Docker images. My
Dockerfile has changed, but these days there are a million articles on how to run Django in Docker, so I won’t cover those changes.
-
I have three application servers where the Django apps run. Each app gets deployed to at least two of them so there is redundancy. This means that a server can fail or go down for maintenance without the site going down. For some of them, there are also Celery Worker and Celery Beat services running to handle offline tasks. There’s an nginx proxy in front of that setup proxying back to the individual Django apps. Consul, consul-template, and registrator are used to dynamically adjust the proxying setup so everything is handled smoothly when a server goes down or when an application instance is added or removed. This part still works basically the same so see the old post if you want more details on how that works.
-
My servers are all managed with Salt, including the production settings and secrets. The Docker containers get those settings in environment variables. Those variables are put in place by Salt and handed to the containers via a couple shell scripts. Again, that part is all unchanged and you can get more details in the old post. What’s relevant here is that there is a
docker-runner script on each server that will run an application’s container with all of the production settings injected and let me basically do manage.py commands in those containers. So docker-runner myapp migrate is equivalent to starting up the thraxil/myapp:$TAG container (where $TAG is specified in a designated file and is generally a git hash) with production settings and running manage.py migrate in the container.
-
Static files are hosted on Amazon S3 and CloudFront. Again, this is pretty typical for Django deployments and is better covered elsewhere. All you need to know for my setup is that
manage.py collectstatic and manage.py compress need to be called during the deployment to push the latest static files up.
The old approach to deployment was that I ran Jenkins server alongside my app servers. When there was a push to the master branch on GitHub, it would trigger a build there, which would do the following:
-
Build a new docker image for the app. I like to include running unit tests as part of the
Dockerfile. That ensures that the tests pass in the exact environment with all the same dependencies as the code will have in production.
-
Tag that image and push it to the Docker Hub.
-
Do a
docker pull of that exact tag on all of the app servers.
-
Write the tag out to the right place on those servers so
docker-runner will use that version of the image.
-
On one of the servers, run
docker-runner myapp migrate, docker-runner myapp collectstatic, and docker-runner myapp compress to handle database migrations and static files.
-
One by one, restart the processes on the app servers.
Jenkins used to run those steps with a fairly small shell script described in the old post. At some point, I converted that to a “proper” Jenkins pipeline specified in a Jenkinsfile. I never wrote about that, and I’m replacing it now, but it’s up here if you are curious. It did some things better than the the shell script version and made for a much nicer overall experience in the Jenkins web interface, but mostly it made me glad that I don’t often have to code in Groovy.
Jenkins worked OK for me but it’s always been a pretty awkward part of the stack and not a lot of fun to run and keep updated.
So when Github Actions came out and I got access to the public beta, I decided to see if I could replace my Jenkins setup.
What I came up with is seems to work pretty well.
Actions for a project are stored as code in a .github directory in your project. There’s a nice web UI for editing actions, but it’s worth looking at the code. My old blog post covered the deployment of my antisocial feed reader app, so for consistency, let’s look at how the GitHub Actions setup looks for it.
I have two workflows. The first just sets up and runs Jessie Frazelle’s branch-cleanup-action
GitHub action which keeps things tidy by deleting merged branches. She has a great blog post on how it works that helped me start to get my head around Actions.
The main deploy workflow, in .github/workflows/deploy.yml starts with:
on:
  push:
        branches: master
name: deploy
jobs:
  buildDockerImage:
    name: Build docker image
    runs-on: ubuntu-latest
    steps:
The first step (actually technically two steps) that runs is:
    - uses: actions/checkout@master
    - name: Build docker image
      uses: actions/docker/cli@master
      with:
        args: build -t thraxil/antisocial:${{ github.sha }} .
That builds the docker image, tagged with the git SHA, which GitHub Actions conveniently exposes in the github.sha variable. As I mentioned before, with my Dockerfiles, the unit tests run during the build, so this step also serves as a good check on PRs.
The next two are fairly self-explanatory:
    - name: docker login
      uses: actions/docker/login@master
      env:
        DOCKER_PASSWORD: ${{ secrets.DOCKER_PASSWORD }}
        DOCKER_USERNAME: ${{ secrets.DOCKER_USERNAME }}
    - name: docker push
      uses: actions/docker/cli@master
      with:
        args: push thraxil/antisocial:${{ github.sha }}
They log us into the Docker Hub and push the docker image there. The only new bit is that the login step uses the secrets field to grant itself access to some secret settings that are stored in the GitHub project settings.
The bulk of the deploy work (that I had to do, at least) is in the next stanza:
    - name: deploy
      uses: thraxil/django-deploy-action@master
      env:
        APP: antisocial
        KNOWN_HOSTS: ${{ secrets.KNOWN_HOSTS }}
        PRIVATE_KEY: ${{ secrets.PRIVATE_KEY }}
        SSH_USER: anders
        WEB_HOSTS: ${{ secrets.WEB_HOSTS }}
        CELERY_HOSTS: ${{ secrets.CELERY_HOSTS }}
        BEAT_HOSTS: ${{ secrets.BEAT_HOSTS }}
That uses a custom action that I placed in its own repo so I could easily re-use it across my projects.
The great thing about GitHub Actions is that they are just Docker containers that get some specific environment variables and shared directories set up and run how you need them. GitHub Actions will find the Dockerfile in there, build it (if it hasn’t already cached), and run it in the appropriate environment.
That means that it’s easy to package up pretty much any common deployment tool you can think of as a GitHub Action (if someone else hasn’t already done it) or just put your own together if you know how to make a Docker image and write a little shell script.
If I were doing this from scratch or if it were a more complicated deployment process, I’d probably grab or build an Ansible action and do the rest of the deployment that way. In my case though, it’s only a couple steps and I pretty much already had a shell script written (see the old post). So I just made an action that pretty much runs that script in a container, with some tweaks to make it work in the new environment.
The Dockerfile is pretty minimal. Just builds off debian:stable-slim (which GitHub highly recommends to keep images small and using a common base to maximize caching), installs openssh-client (the only package we need that isn’t already there) and drops in a small script.
That script should look familiar from the old blog post. It just does a few additional things to deal with the GitHub environment variables and setting up a valid SSH config. All of the variables that it needs are either set via env in the workflow config above, or they are stored in the project settings as secrets (SSH private key, etc.)
Finally, since I like to use Sentry to track exceptions and Sentry does a better job if you tell it when you deploy new code, I use a community published action to publish a new sentry release for the project:
    - name: sentry release
      uses: juankaram/sentry-release@master
      env:
        ENVIRONMENT: production
        SENTRY_AUTH_TOKEN: ${{ secrets.SENTRY_AUTH_TOKEN }}
        SENTRY_ORG: thraxil
        SENTRY_PROJECT: antisocial
That’s basically it. I’m mostly pleased with the setup. It took me a few hours to figure out all the pieces and work through some stupid bugs (my own) to get it working how I wanted, but now it’s pretty solid.
Like I said earlier, I really like that it works by just stringing together Docker containers. That means there’s never any question about when GitHub Actions will support some tool. If you can stick it in a Docker image, you can use it. Configuration is straightforward once you’ve spent some time with it (and the Web UI is surprisingly usable and powerful).
I feel like I’m only scratching the surface of what it’s capable of (I’m not even running anything in parallel). The more interesting uses will be less of this “traditional” kind of deployment pipeline and will take better advantage of the Actions’ direct access to the rest of GitHub’s APIs. Right now it feels like the community is still figuring out what those possibilities are and I’m excited to see what patterns emerge.